How do I print using a different paper design?

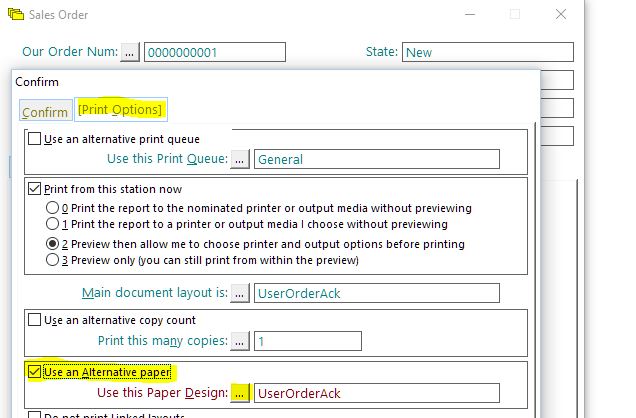
When printing a document, you can tell Match-IT to use an alternative paper design as follows:-

  1. Select the second tab of the printing window – Print Options.
  2. Tick the Use an Alternative paper checkbox.
  3. Select the desired paper design using the ellipses button.
  4. Continue as normal.

The screenshot below shows an example of printing a sales order acknowledgement; you would use the ellipses button to select a paper design other than UserOrderAck.

altpaper

How do I know when a new version is available?

We build Match-IT every night and you can always upgrade to the latest release of the current version.  Sometimes we’ll tell you that a feature or fix will not be available until a particular version is released, which we will announce in a news item.

You can subscribe to news items via the footer of this website to get email updates, or by following us on facebook or twitter.


What is free issue stock?

The free issue stock facility operates as described below:-

1. There is a flag in the material record – Is Free Issue. Note that the flag is against the material, not a PART in a method.

2. When this flag is set, it triggers the scheduler to create a new type of purchase line – free issue – and associate the customer for the schedule demand with it.

3. There is a free issue purchase schedule similar to the normal purchase schedule.

4. Lines in the free issue purchase schedule can be approved and printed, but it’s optional.

5. The event diary system nags for free issue stock, as for a normal purchase.

6. When booking-in goods, selecting a free issue item against a non-approved purchase line will auto approve it.

7. You can buy things directly from customers if you wish, there is no need to create another supplier record for them. Similarly, you can sell things to suppliers.

8. 6 and 7 are possible because you can associate two account references with a supplier/customer. One for use when selling and the other for use when buying. The appropriate account code will be passed to the accounting system. They can be the same.

What does the urgent scheduling strategy do?

Match-IT will always find the cheapest route through a schedule; i.e. when evaluating alternative materials, resources and purchases/sub-contracts.

Use of the URGENT flag forces Match-IT to change strategy to find the quickest route, but only when doing ASAP schedules. URGENT has no effect on JIT schedules. Note that (as has always been the case) if a JIT schedule fails, Match-IT will turn around and perform an ASAP schedule.

Approving works orders

Most companies approve works orders (WO) in a different order to that in which they were scheduled. This can result in non-optimal use of stock; for example Match-IT may be asking you to kit from two batches of the same material whereas in fact you know you can kit it from a single batch.

The effect of such non-optimal kit lists can be felt in stores. Another result of starting works orders in this way is self-referential returns; meaning that Match-IT will not let you start WO A because it wants a return from WO B (because B was scheduled first). To overcome both of these issues we now always perform a reschedule of a WO when it’s approved. These reschedules ignore all kit tentatively allocated to other WOs waiting to be approved – resulting in optimal kit for the WO that is being approved. The side-effect of this is that if you start lots of works orders in a different order to that in which they were originally scheduled, they will appear to be unkittable – because another WO has ‘stolen’ it’s kit when it was approved.

However such works orders can usually be approved because alternative kit will be found during it’s own approve-time schedule. This behavior is not appropriate to all companies and so there is a default to turn auto-approve scheduling off should you require it. A pending tweak is to extend the kit state flag (K) to include a character implying ‘this WO was kittable but it’s kit has been stolen and now it’s not kittable without an approve schedule’. The above logic also applies to sub-contract purchase orders. The difference is that Match-IT performs the reschedule when the SCPO is created. Again a default exists to disable the auto scheduling.

Nominating a Match-IT recovery station

When starting Match-IT after a windows crash or lock-up, Match-IT will automatically start in recovery mode. Sometimes Match-IT will tell you that a recovery station has not been nominated; this note explains how to nominate one.

1. Make sure that nobody is using Match-IT.

2. Start Match-IT on the station that you wish to nominate as your recovery station. In normal circumstances the recovery station should be your server because recovery often involves a lot of computational effort. If you do not have a server, choose a powerful workstation.

3. Press the space bar when you see the grey splash screen appear with the Match-IT logos. This will take you into a window that allows you to set/clear various start-up options.

4. Click on the tab that says /recover and then press the button labelled Add this option. Now press Resume.

That’s it, you have now nominated a Match-IT recovery station. You should always use the recovery station when starting Match-IT after a windows crash or lock-up. It’s good practice to make sure that everybody is logged out of Match-IT first.

Getting started with user-designed paperwork

Many early users will be using paperwork designs that cannot be edited without some rework by Match-IT. Later system moved to completely user-editable paperwork designs. This note points the way forward if you would like to start moving from the old style paperwork to the new user-editable paperwork.

A good place to start is probably your works order because it doesn’t go out of the company and you can probably live with a few anomalies while you get it right. It’s always best to edit an existing paperwork design rather then create one from scratch and that’s what we’ll do here.

Your works order paperwork is controlled by a layout that a MC module default called Make Job Card Layout points at; the default may be called Job Card Layout on older systems. We’re going to use this default to access the layout responsible for generating the paperwork and change that – we’re not going to change the value of the default itself. This will become clearer later.

Press F4 to get a list of defaults. Click Show all classes and then type mc and Enter to locate on the MC module (Class) defaults. Move down to the default mentioned above
and select it, then press the System Value button. The first thing to remember is that this default has a layout as it’s value and that a layout is something that contains a reference to a printer and a paperwork design – so we don’t want to change the layout that the default points to, but rather, the paperwork that the layout points to. Click on the ellipsis (…) button next to System Value and then click the Detail button. You are now looking at the detail of the layout that the default points to.

You’ll see that that the printer is defined in the first tab and the paperwork in the second tab. Click on the tab called 2. Paper and then click the ellipsis button next to the Paper prompt. You can now select a new paperwork design. You’ll see one called UserJobCard with the E column ticked – meaning it’s one of the new editable paperwork designs. Click on this paperwork design and then click the Select button. You have now changed the paperwork design that the Job Card layout is pointing to. You’ll see that the Editable flag is now ticked in the Paper Properties box. Save and Close the layout, Close the Select Layout window and Close the System Default window.

When you approve works orders now, the new editable design will be used. Go with the standard design for a while and then decide on changes you would like to make.

To edit a paperwork design, use the above technique to navigate to the Available Papers browse and click Edit (rather than Select), or fire off the Available Papers browse directly. It’s probably not in your current menu structure so you’ll need to get to it via the Processes+GoAnywhere menu. It’s an OL module process called Available Papers. Select that line and Execute it. Now find the UserJobCard paperwork and Edit it.

You are now in the “List and Labels” design form. Read the help via the ?+Contents menu. Use File+Save to save any changes. Make simple changes first while you get used to it. There are options for previewing your changes and for viewing a list of the fields that you can include in the design (View+Windows+PopupVariables).

To get help on what the variables available contain, use the Match-IT help file. From the Help+HelpTopics menu item, double click on Reference and then Report Files. This is a list of all the reporting files. Double-click on a file to see an explanation of the fields it contains.

There are also some standard OL module defaults that you can include in the design. These are available for selection from the Variables section of the popup window and contain things like your company name and address. They also contain standard header and footer text for documents that you can change on a per customer/supplier basis (because they are defaults).

How do I print to a web page?

Using the HTML View layout when printing browses (for example the materials catalogue) generates a HTML format report and displays in your default internet browser. Once in your browser it can be printed, emailed or saved to disk for upload to a web site etc. Another advantage of the HTML report is that data columns are auto-sizing and you can fiddle with the HTML afterwards if necessary.

How do I access recently used records?

When starting builds later then 21.1.8 you will notice that a little window appears called the MRU list. This is a list of Most Recently Used records; think of it like the History bar in Internet Explorer; double clicking on a record brings up the edit window for it. For example you may have been editing a material recently and need to edit it again; instead of going back to the Materials Catalogue and finding the record you can just scan down the MRU list and double click on the appropriate entry. Those records used most recently appear at the top of the list. The list is usefully resized to be thin but long and placed at one side of your Match-IT desktop.

It’s appearance at startup is controlled by a GX module default called Auto start recently used list; as such you can configure Match-IT to have the list appear on a site/station/user/role basis.

Try it and let us know what you think; please don’t hesitate to send critical feedback.
This facility has been there for a while; the appearance on the desktop and the default controlling it is new.