Setting your window layout preferences
When you first open a screen it will open at its smallest size and in the middle of your desktop. The only exceptions to this are the ribbon menus. They will initially open cascaded to the right of each other.
You can move the screens within the desktop and change their size using the normal Windows™ dragging conventions. The system will remember your preferences and the next time you open the screen it will open in the position and size you set previously.
If you change the size of a screen containing a browse list, the list will expand to fill the space you’ve given it. This is useful when there are more columns in the list that you want to be able to see. You can also change the width of the individual columns in a list by dragging the column dividers and these settings will be remembered too. This is useful if the initial column is not wide enough to show the whole field; in this case just make the column wider. It is also useful if you’re not interested in a column; just set its width very small. The column widths you set will be restored the next time you open the screen. The widths you set will also be used when the list is printed. You can use this to juggle things so they fit nicely on the printed page.
The position and size preferences you set are specific to you and the station you are working on. This means other people’s settings will not interfere with yours. The settings are station specific because what looks good on a station with a big 19” monitor is likely to be unusable on a station with only a 15” one.
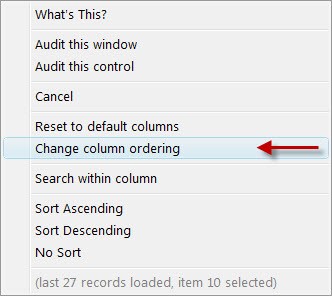
Most of the lists can also be edited to change the order of the columns shown and you can even remove columns completely. Right-clicking any of the column headings in a list accesses this facility.
A pop-up menu like this will be shown: Selecting Change column ordering takes you to an editor where you can move and/or remove columns. The edits you make can be saved as the overall system default layout, or the default for specific users, or just your personal preference. |
|

