Setting up your accounting system interface

Contents
All file paths and files are given relative to the installation folders of your accounting system and Match-IT. Match-IT is far more configurable than most accounting systems, so the bias on the configuration is such as to make the accounting system end easier. For the purposes of this topic it is assumed that you have a standard Match-IT ribbon menu structure; if you have customised your ribbons menus, you may need to use different menu items to those specified below. These configuration procedures need only be done once, but must be done before any data transfer takes place.
The instructions given here are generic and apply to the Match-IT 'side' of all CSV file based interfaces. Instructions for the accounting system 'side' for any particular interface are given elsewhere. In those instructions each of the How do I ... headings below are repeated for the accounting system 'side'.
See Accounting Software Interfaces for guidance on writing your own accounting system interface.
You can see the definitive list of available interfaces by going to Functions | Setup | Setup accounts... | Accounting System, this will open the accounts centre record for the default accounts centre. The scripted interfaces available are listed under the Script Name drop-down list on the Options tab.
How do I set to use a scripted interface?
You must specify in the accounts centre record which interface you are using. A way to reach the accounts centre using the standard menu is: Functions | Standing Data | Accounts | Accounts Centres, from there pick the appropriate accounts centre and press Detail. A form like the one below will be shown:
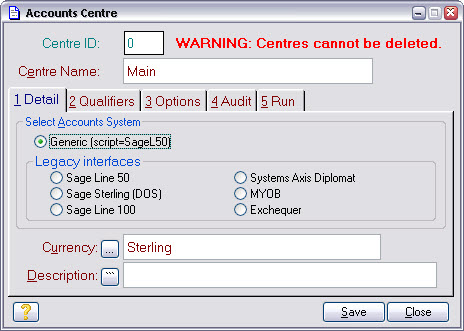
Check the appropriate interface. Use Generic for all script based interfaces. Then select the Options tab. What you will see there will depend on the interface selected. For the Generic option it will look like this:
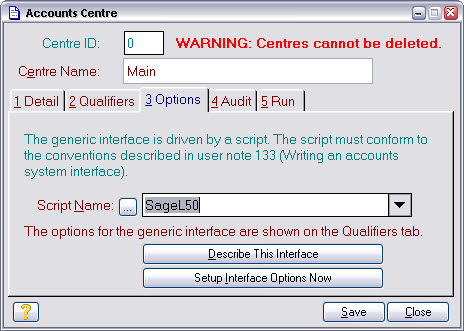
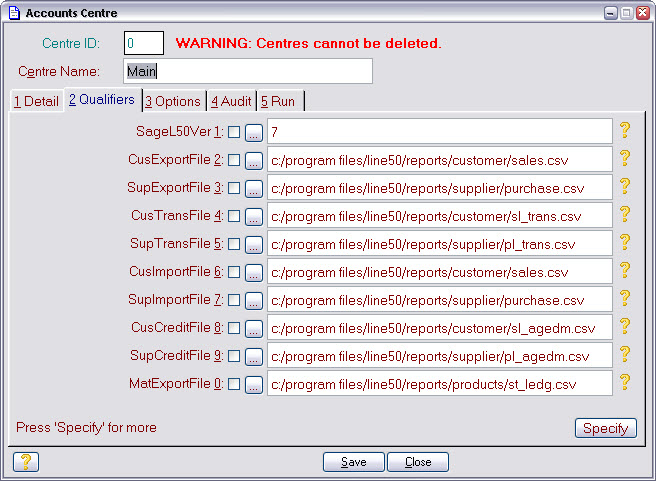
Use the drop down list to pick the Script Name that represents your interface. Press Describe This Interface to get a brief description of the interface and its capabilities. To configure the interface press Setup Interface Options Now. What happens next will depend on the interface and to what extent it has already been configured. If no configuration has yet been done, you will be presented with a message that indicates what has not been done and a hint on how to do it. Press OK on this. You will then be back at the accounts centre form, but this time if you select the Qualifiers tab you will see that it has been setup with prompts for information the interface requires, typically paths to files it needs to read or create. In most cases the prompts will be pre-filled with a default value. Just edit them to suit your needs and then press Save and Close.
By way of an example, below is the qualifiers tab the Sage Line 50 (scripted) interface will produce:
How do I set to use a legacy interface?
These interfaces are 'hard-wired' and cannot be altered. All modern interfaces use the scripted system which provide much more flexibility. To use a legacy system, check the appropriate option on the accounts centre form, then on the Audit tab, press Ledger Files, then Detail. This opens the form to specify the file paths for the legacy interfaces. Fill-in these as appropriate for your accounting system.
How do I import my customer list?
This is an activity that you would normally only do once when you first start using Match-IT. The term Importing here refers to transferring information into Match-IT.
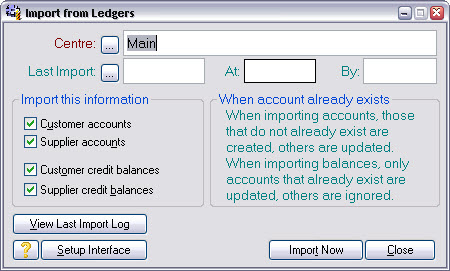
Import the CSV file that you created from your accounting system. This is done from the Import From Ledgers window. A way to reach this using the standard menus is: Functions | Standing Data | Accounts | Import Accounts. Just check the Customer Accounts check box and press the Import Now button. To review your customer list use the Find Record | Customer menu.
The Import From Ledgers form is shown below:
How do I import my supplier list?
The procedure is the same as the customer case except check the Supplier Accounts check box.
How do I import my customer credit balances?
This is an activity you will do on a regular basis.
Import the CSV file that you created from your accounting system. This is done from the Import From Ledgers window. A way to reach this using the standard menus is: Functions | Standing Data | Accounts | Import Accounts. Just check the Customer Credit Balances check box and press the Import Now button. To review your customer credit position use the Find Record | Customer menu, then look in the Account information.
How do I import my supplier credit balances?
The procedure is the same as the customer case except check the Supplier Credit Balances check box.
How do I export new customer accounts?
This is an activity that you would normally want to do on a regular basis, usually daily or weekly. The term Exporting here refers to transferring information out of Match-IT.
Match-IT automatically detects the first trading transaction you do with a new customer. It will automatically assign a new account name that corresponds to the rules specified by your accounting system. You can change this name if you wish prior to exporting it. These new account names are the candidates for exporting to your accounting system.
Use the Functions | Standing Data | Accounts | Export Accounts to start the export window and tick Export new customer accounts. When you click on the Export Now button, all new customer accounts will be exported to a CSV file in the path specified in the Options tab of the accounts centre. Once a customer has been export it is marked as In Accounts in the customer detail form. This is a tick box that can be reset by hand in the future if you wish to re-export a customer.
The Export To Ledgers form is shown below:
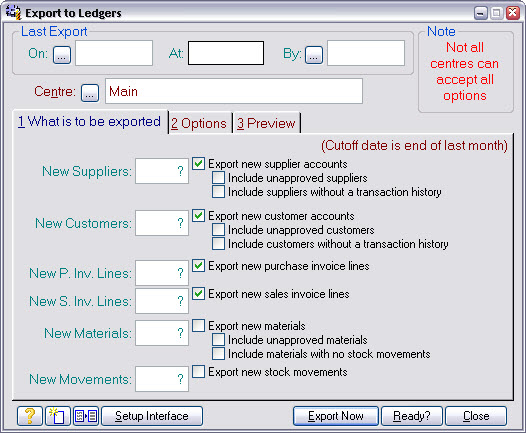
The fields that show as ? are showing the number of candidate records that are ready to export. This can be a lengthy calculation so is not done unless you press the Ready? button. It is not necessary to do this before using the Export Now button.
How do I export new supplier accounts?
The procedure is the same as customer accounts except check Export new supplier accounts.
How do I export new sales invoices?
The procedure is the same as customer accounts except check Export new sales invoice lines.
How do I export new purchase invoices?
The procedure is the same as customer accounts except check Export new purchase invoice lines.
How do I export new stock codes?
The procedure is the same as customer accounts except check Export new materials.
How do I export new stock movements?
The procedure is the same as customer accounts except check Export new stock movements.
What if I make a mistake?
The Match-IT export procedures are designed to minimize the possibility of you making a mistake. For example, you are not allowed to perform the export if there is nothing available to be exported. However, Match-IT takes steps to backup your export data. As a preliminary step to all export actions, it will take a copy of the last export CSV file set. The copies are given a sequence number that is used as the file extension in place of the .CSV. The first copy will be sequence 0. The next time they will be sequence 1, etc. When sequence 999 is reached, it starts again at 0. This means you can recover the previous version of the files should you lose the current ones.
The most likely mistake you will make is to re-export you invoices before you have imported the previous set to your accounting system. If you discover you have done this, just set aside the current set, rename the newest old set, import those to your accounts, then restore the current ones and carry on.
Most accounting systems perform extensive verification during the import process and will reject records that have a problem, reporting what the problem is and on which record it occurred. The most likely problem is that some code has not been setup in your accounting system.