Assembly

Contents
An Assembly record marks the beginning of a sub-method for an assembly that is going to be incorporated into the final product. An assembly can contain steps with parts and resources just like the main method. They are referred to in the main method by their name in a PART record. They behave in exactly the same way as a method for a manufactured part; the only difference is that its definition is embedded in another method. Here is another way to define our A Table example above using assemblies:
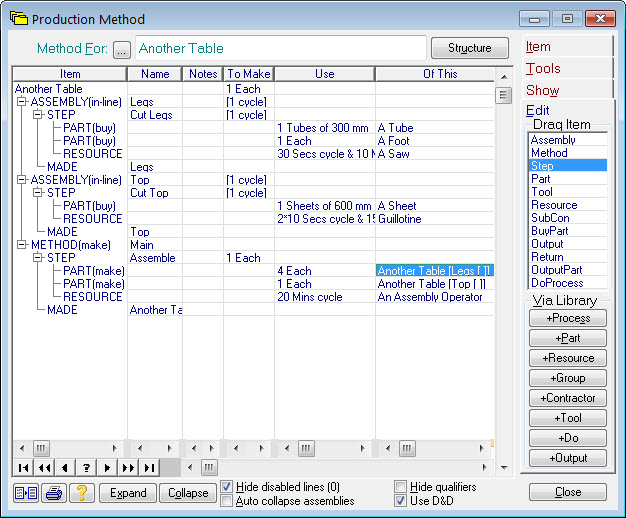
Here we’ve defined an assembly to make one leg and another to make the top, then in the main method they are just called up as PARTs. Notice the names used in the PART record are of the form Product Name [Assembly Name], the part within the [ and ] is the name you gave the assembly.
Defining the method in this way allows the planning system to manufacture the legs and the tops at the same time if resource capacity allows.
Hint: You can make a PART record for an assembly by control-dragging the ASSEMBLY line into the method STEP where you want to use it. Hold the control key down, then drag the ASSEMBLY line and drop it in the STEP. A PART record will be created that refers to the assembly.
There are several types of assembly:
Works Order
A works order assembly specifies that you want the assembly made under its own separate works order and not be part of the main product works order.
In-Line
An in-line assembly specifies that you want the work for the assembly to be done as part of the works order for the main product. The assembly steps appear on the paperwork along with the rest.
Bought
A bought assembly specifies that this is something you buy rather than make. These behave exactly the same as raw materials in your main materials catalogue. They are useful for special materials that have to be bought for this product and are not useful for anything else.
Free-Issue
A free-issue assembly specifies that the customer gives you the part for incorporation into the product; you do not have to buy it or make it.
Output
An output assembly is a place-holder for something the main method (or one of its assemblies) will create as a side-effect. For example, imagine our table has a rectangular hole cut out of the middle of the top and the piece cut out is to be used to make a ‘wing’ on each table edge. The method for this could look like this:
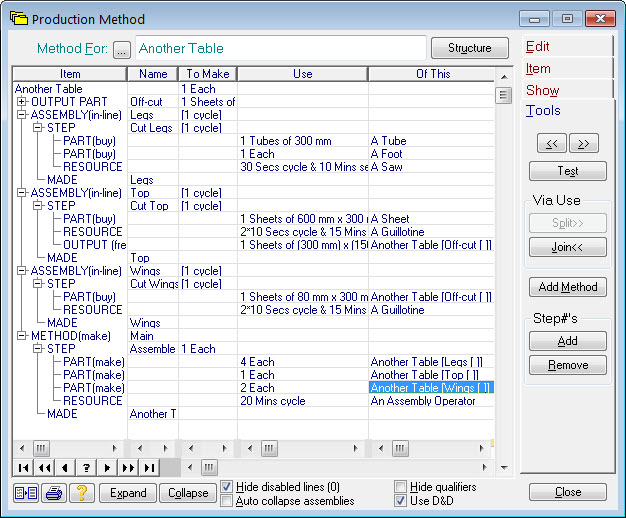
Notice the Top assembly is producing the OUTPUT and the Wings assembly is using it.
Re-size
A re-size assembly specifies that some raw material is going to be made into a different size. These are typically used to prepare bars for bar-fed lathes that cannot take the full length as supplied. A re-size assembly can only consist of a single STEP with a single PART.
Here is an example that reduces a 3 metre bar to 1 metre then machines those 1 metre lengths:
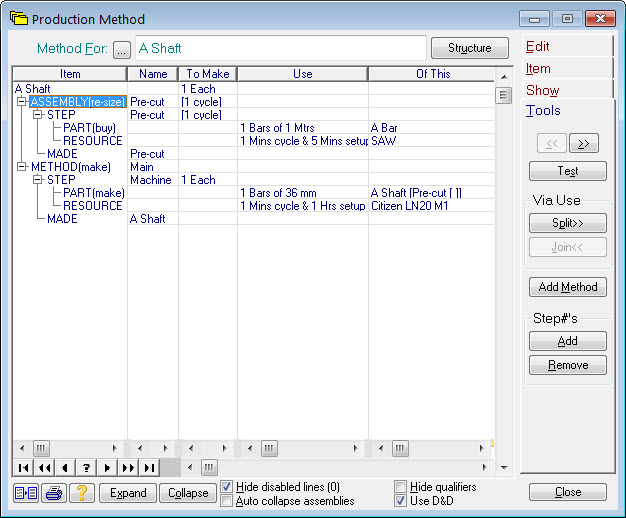
This will create two works orders, one to pre-cut the bars to 1 metre lengths, then a second to machine the 36mm shafts from those lengths. The size the bars are being pre-cut to is specified by the PART use column in the assembly, in this case “1 Bars of 1 Mtrs” The use column in the main method specifies the length required for each shaft, “1 Bars of 36 mm”. Note: the planning system will only cut-down full size bars if it cannot find any stock of bars at or below the pre-cut length (1 metre in this example). Also, any off-cuts are fully tracked through both cutting operations, as are yield calculations. The off-cuts from either operation (Pre-cut or Machine) are the same material and considered to be the raw material ("A Bar" in this case). So other methods requiring "A Bar" will pick-up off-cuts from wherever they occur.
The above is a ‘1D’ example, but re-size assemblies can be used equally well on ‘2D’ materials (i.e. sheets).
In-Line re-size
An in-line re-size assembly is identical to a re-size assembly except the re-size operation is done within the same works order as the main method (as a separate STEP).